Newsletter to Blog: Converting to Blog Posts Part II
As we proceeded with the conversion from newsletter to blog, I became more and more confident we’d made the right decision in manually transferring the data from the newsletter to the blog.
As covered in Part I of this section of the series, the newsletter team and editor learned “how to blog” while copying and pasting the content. It also helped to clean up all the things that would have needed cleaning anyway, going from Microsoft Word and Publisher, as well as “print”, into a blog.
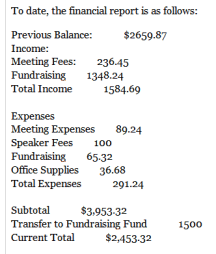
The biggest challenge in the process came with the Treasurer’s Report. The team needed to be introduced to HTML tables.
Publishing Tables and Data
Thinking “word processor”, the newsletter editor had copied and pasted the Treasurer’s financial reports into the WordPress Rich Text Editor and used spaces to line up the numbers. When previewing the post, the numbers didn’t line up, even though they did in the Editor.
It was time to introduce the newsletter editor to HTML tables.
WordPress currently doesn’t offer a table feature in the Rich Text Editor, though there are many requests to add one. This mean a lesson in HTML and HTML tables and a lesson in working with a text editor as a reference guide.
 I thought that I could copy and paste a table from Word into the Rich Text Editor, but found that the save and continue or clicking on the CODE tab caused the table-format to dissolve before my eyes. The versions of WordPress I’m using can’t cope with the copy and pasting of the table format.
Fortunately, or not, I found that while blogging was also new to the newsletter team, so was desktop publishing in Word. They’d used tabs and spaces to create the Treasurer’s Report, not tables. When saved to blog format, the spacing of the spaces and tabs (which don’t exactly exist in HTML) made the numbers not line up at all.
There were a lot of ways we could have handled the issue of making the brief financial summaries look good in the blog, and tables were the best way. But how do you introduce a complex notion of HTML table tags to people who want this done, and not tinkered with?
Here are some of the solutions we came up with:
- Copy and Paste From Text Editor Template File: With a text editor, a table template was typed up that the editor or Treasurer could easily type information into and copy and paste into the blog posts each month.
- Create HTML Tables Online: There are very few “good” online HTML table generators I’ve found. Many feature archaic HTML features and form. Here are few that looked good:
- HTML and CSS Table Border Style Wizard
- 2 Create a Website – HTML Table Tutorial
- HTML Table CSS Style Sheet Generator (old form code style – must have all codes in caps changed to lowercase but does offer extensive styling of tables)
- WordPress Plugin to Enhance the Rich Text Editor: AI3’s Advanced TinyMCE Editor WordPress Plugin adds a ton of additional quicktag button features to the WordPress Write Post panel, including support for tables such as adding and removing rows and columns. This is ideal for full version WordPress blogs.
They choose the Advanced TinyMCE Editor WordPress Plugin, though decided to rely upon the text editor option for quick and fast copy and pasting from month to month if there are only a few changes.
WYSIWYG is Not WYSIWYG: Thinking HTML Not Desktop Publishing
One of the interesting things about working with the Rich Text Editor in WordPress is that you can “see” what you are doing. To a point. However, that doesn’t mean you are using the proper code to make what you see really work as proper HTML code.
For example, using the Rich Text Editor like a word processor or desktop publishing program, the newsletter editor bolded article section headings and then increased the font size. She also spent a lot of time hunting for different fonts to make the text look different throughout an article.
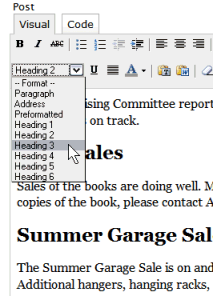
Heading Confusion
 Publishing in HTML is similar but different from desktop publishing. Section headings are in heading tags, defined by size from largest to smallest as
 h1, h2, h3, h4, and so on. The design elements to establish the font size and weight (bold) is controlled through the WordPress Theme’s stylesheet, not necessarily through the Rich Text Editor.
Without understanding this critical element, the newsletter editor chose to use the H1 tag for a heading and was staggered to find that her blog header format popped up in the final published post. When she switched to H2, the post title’s look was then displayed in the blog post. It took a while to figure out that the ones she wanted to use were H3 and H4, and notes had to be taken to instruct contributors to only use those two, which didn’t make much sense.
To avoid confusion, I quickly redesigned the WordPress Theme they had chosen to put H1, H2, H3, and so on into their blog post area with their own styles. Now they can use the headings in a way that makes sense to the inexperienced web publisher, with four “levels” to break up content in their blog posts.
Failing Web Fonts
In print publishing, the world of fonts is literally an open book. You have endless choices and options, including sizes. In web publishing, you are restricted to about a dozen fonts. You can’t pick and choose which font you want when. The fonts work only when the computer which is accessing the website has those fonts installed on their machine. Deciding you want something in the text to be in a font called “Freehand” doesn’t mean it will be in Freehand when someone else looks at the page. You may see it because you have it on your computer.
Some in the newsletter team wanted to preserve the format and font designs within the blog. Others just wanted easy-to-read and be done with all the clutter. It was a tough debate. It got easier, though, when the group realized that their choices were limited to web fonts like Times Roman, Tahoma, Trebuchet, and Comic Sans and there was no way to use Book Antigua, Baby Boston, or Desearea.
Indention versus Blockquote
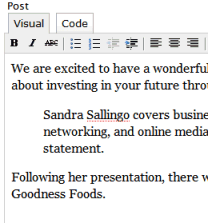
For some twisted reason I don’t understand, the Rich Text Editor in WordPress designates the BLOCKQUOTE HTML tag as “indention/blockquote”. To the average web-illiterate person, “indent” means either to indent the first line of a paragraph or to force over the whole paragraph away from the left margin.
In HTML, a Blockquote tag not only indents the text but often features a design element that separates the blockquote from the rest of the text. A blockquote is used to “quote” someone or from another resource. It isn’t used just to indent some text.
There were two major problems with the indention/blockquote button.
 When the newsletter was adding some text to a post, she used the indention/blockquote button to indent some text. She wanted to indent, as in the traditional sense of the word. She then couldn’t un-indent. Each time she hit the enter key, the paragraph was still lined up indented. She hit backspace, and it just went back to the indented paragraph. She hit delete, escape, and then selected and choose “Paragraph” from the formatting drop-down box – nothing would put the cursor back to the left edge.
She finally deleted the whole post, just like you would for a frustrating page in your word processing program, and started over. It did the same thing. She finally called me and I showed her how to click within the blockquote area to trigger the secondary button that appears next to the blockquote button when clicked. This button moves the cursor back to the left margin and out of the blockquote tag.

I recommended to not “format” the page until she had typed it all in to prevent this in the future.
 In the Rich Text Editor, the indented paragraph looked indented. Nothing more. When viewing the WordPress Theme version of the page, the newsletter editor went nuts. There on the page were borders and lines around her indented paragraph and she couldn’t get rid of them. They aren’t there in the Rich Text Editor, so where did they come from on the page? And how do you get rid of them?
Another call and I explained the purpose of the blockquote was to style quotes not indent. I also had to explain the way CSS and HTML worked to display the design elements of a page, and admitted that what-you-see is not what you get.
She fumed about the button being labeled “indention” and not being able to see the graphics in the Rich Text Editor.
WYSIWYG in the WordPress Rich Text Editor is not what you get when you see your post in your WordPress Theme. Headings are different, blockquotes/indentions are different, the fonts are different, links are colored differently, everything is different. The Rich Text Editor only gives you a hint of what it looks like, not the real thing.
To see it, you have to use the Post Preview – which caused more problems for this determined group of business women. They had to learn about tabs in browsers, opening up tabs to work on their WordPress blog posts and other tabs to view the preview of the page. The struggled with this for a long time, wishing the preview was on the same page. I didn’t have the heart to tell them that it once was, making this process so much easier and consolidated. Later, I put the preview back in through the Preview Frame WordPress Plugin.
Cleaning the Rest of the Post Publishing Details
Here are a few more post publishing details that required fixing and cleaning during the newsletter-to-blog conversion:
- No Capitals: While capital letters can be used as headings and within a printed newsletter, on the web, words in CAPITAL LETTERS are considered SCREAMING, YELLING, and SHOUTING. These had to be converted into upper and lower case letters. Luckily, Notetab offered quick select and change case options for conversion.
- Underline Means Links: The use of underlining for emphasis changes when converting from print to web. Any text that is underlined on a web page is a hint that the words are a link. The underlining had to be removed from a lot of the newsletter text to avoid this confusion.
- Over Bolding and Italics: While too much bold and italic text is hard to read in print, too much on a web page is clutter and can be very hard to read on the screen. We removed huge areas of text in bold and italic, leaving them “normalized”. When emphasis was required, we used italics, saving bold for headings and special emphasis.
 Choosing the Type of List: In web publishing, there are two forms of lists: bulleted and numbered. Deciding which one to use depends upon the content. As a guide, things that are counted in a list are numbered, such as top ten, 5 reasons why, or step-by-step instructions. Everything else is a bulleted list.
In the next issue of this ongoing series on converting a newsletter into a blog, I cover one of the biggest problems with newsletters: Copyright protection and violations. How to copyright protect your work, and how to prevent contributors from violating the copyrighted work of others.
Converting a Newsletter Into a Blog Series
- Converting a Newsletter Into a Blog
- Newsletter to Blog: Turning Article and Reports Into Blog Posts
- Newsletter to Blog: Establishing The Post Categories
- Newsletter to Blog: Converting to Blog Posts Part I
- Newsletter to Blog: Converting to Blog Posts Part II
- Newsletter to Blog: Quoting, Referencing, Citing, and Not Copyright Violating
- Newsletter to Blog: Blogger’s Friend – The Text Editor
- Newsletter-to-Blog: Converting Old Newsletters and The Benefits of Conversion
The author of Lorelle on WordPress and the fast-selling book, Blogging Tips: What Bloggers Won't Tell You About Blogging, as well as several other blogs, Lorelle VanFossen has been blogging for over 15 years, covering blogging, WordPress, travel, nature and travel photography, web design, web theory and development extensively as web technologies developed.


 Choosing the Type of List: In web publishing, there are two forms of lists: bulleted and numbered. Deciding which one to use depends upon the content. As a guide, things that are counted in a list are numbered, such as top ten, 5 reasons why, or step-by-step instructions. Everything else is a bulleted list.
A lot of your trouble stems not from converting desktop publishing to HTML, but from the fact that the person doing th desktop publishing was very sloppy.
Any newsletter publisher worth salt knows about styles. You never bold, indent, number, change the font, etc.. You use styles. Just like you use css.
If your document is properly stylized, conversion is straightforward. Heading 1 becomes H1, Strong becomes bold style, etc.
Yehuda
Yes, this is true in some of the cases. But these people aren’t professional publishers. They are a volunteer membership organization, of which there are many in the world, who use what skills their members have, and then change roles within the organization annually.
They can’t afford expensive programs for publishing. And they learn as they go. They aren’t paid, and the last one trains the next one. So mistakes and hardships are passed on.
Also, I’ve run across “professional” designers who don’t know anything about styles, even today.
Still, the issue of adding links (and understanding how they work), and WordPress Theme and HTML is knowledge that doesn’t come with print publishers.
There are always easier ways to do everything, but I thought this was an interesting case to write about in this series as those who are experienced at this would pull out the tips and bits they needed to make such a conversion. And those who are novices, like the group I was working with, would see the bigger picture and consider adding a blog to their communication options.
You are right. They “should” have known better. But I’m amazed at what they did accomplish with the little these volunteers knew about what they were doing. Their printed newsletter was really good looking and had great content – as long as you didn’t look under the hood. :D