How to implement a CDN on your website

Setting up and hosting a website isn’t the only thing you need to deliver site content to your audience and ensure a positive user experience.
A content delivery network (CDN) is another important tool that can improve how your site visitors access your content in a quick and secure way.
Contrary to popular belief, setting up a CDN for your site is actually quite easy. This post will walk you through exactly how to do it using Incapsula CDN.
But first:
What is a CDN?
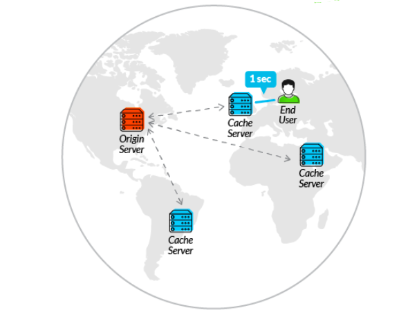
A CDN is a service designed to shorten the distance between site visitors and your website server by storing cached versions of your content at different points of presence (PoPs).
CDNs have servers set up around the world that store your site content so that people in different locations can access it quickly. For example, if you have a US-based website that receives a lot of traffic from people in Europe, you can use a CDN to deliver your site content from a local European server, instead of forcing visitors to wait for content to cross the Atlantic.
What are the benefits of using a CDN?
CDNs are a great tool when you run a website whose users are based around the world. But they actually have a lot of benefits for different kinds of web properties. CDNs can help:
Improve page speed
Delivering content from closeby servers improves website loading times. Research has shown that even a second-long delay can reduce conversions by 7%, page views by 11%, and customer satisfaction by 16%.
Reduce bandwidth consumption
By caching your site content, CDN can reduce the amount of bandwidth needed by the origin server, reducing consumption and costs for website owners.
Handle high traffic loads
You already know an influx of traffic can temporarily break your site. When you use a CDN, it gives your site the flexibility to handle more traffic. Delivering cached versions also gives you some forgiveness when you face hardware failure.
Improve website security
Depending on the CDN you use, it can also provide features that improve your website security, such as DDoS migration and security certificates.
Whether you realize it or not, you interact with CDNs whenever you surf the web. They’re a worthwhile tool for just about anyone trying to build an audience or business from their website online.
How to implement a CDN on your website
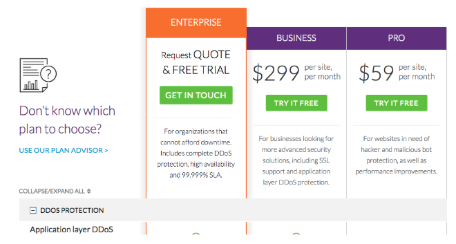
While there are some free CDNs available, most are actually freemium services and won’t deliver the features you actually need from a CDN unless you pay.
This walkthrough shows you how to sign up for the “Pro” version of Incapsula CDN at $59/month. It starts out with a free trial, so you can always cancel if you aren’t satisfied with the service.
Start by navigating to Incapsula.com. From the CDN pricing page, click “Try it for free” on the pro plan:
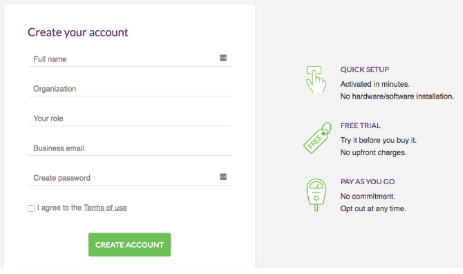
On the next page you’ll be asked to fill out your full name, organization, email, and password:
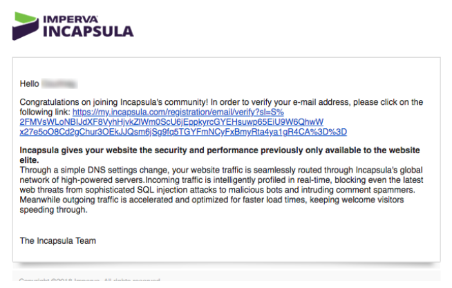
If you already know which domain you need to implement the CDN on, then you can fill out a email from that domain (e.g. [email protected]). Then when you click “Create an account,” Incapsula will automatically send you an email to verify that email/domain:
If you use a different email or have several domains you want to install the CDN on that’s fine, you’ll just have to verify those email addresses as an additional step later on in the setup.
Click through from the verification link you received by email to log into Incapsula. Then you’ll find yourself on a page prompting you to add your first website:
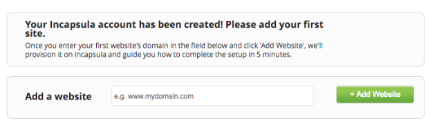
The great news is that you don’t have to fill out payment information to try out the Pro plan. You’ll probably get prompted to later on after your free trial expires. For now, type in your domain into the box provided and click +Add Website.
Now you’re already done with step 1 in their 3 step process. The next page should show you step 2: Scanning records. This actually doesn’t require you to do anything other than verify that the information they pulled up is correct.
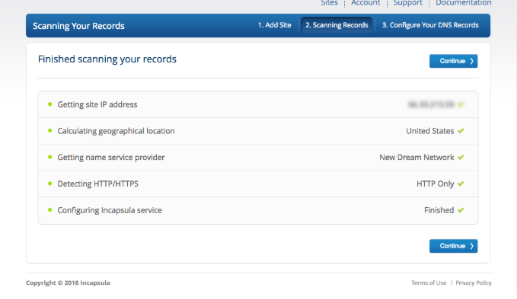
If everything looks in order on this page then click the “Continue” button on to step 3: Configure your DNS records.
Step 3 involves the bulk of your work to set up the CDN. It’s actually 3 steps rolled into one:
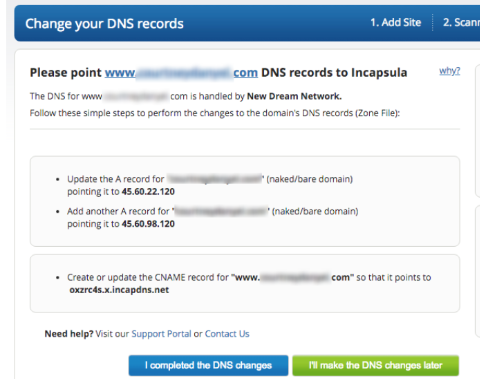
This page is asking your to point your website DNS records to Incapsula by:
- Updating your A record
- Adding another A record
- Creating or updating the CNAME record for your site
Don’t worry, you don’t have to understand what all that means in order to do it successfully.
First you need to figure out where your DNS records are so you can change them. In most cases they are handled by your web hosting control panel. If you can’t remember what your web host is, Incapsula tells you in the instructions:
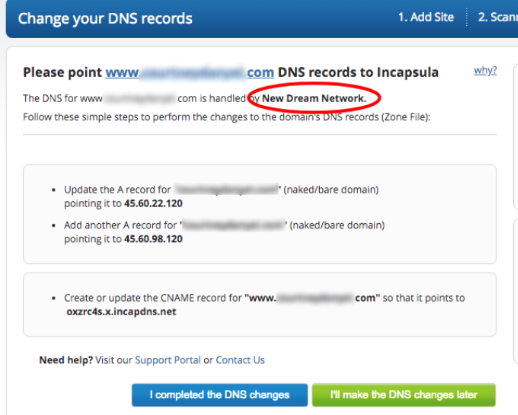
This site is hosted by DreamHost, so I can find and edit the DNS files there.
So you need to go to your hosting service and log in with your account. You should be able to find your login information by searching your emails.
How to find and edit your DNS files is a little different on each platform. In this walkthrough I’ll show you how to find the files on cPanel, since it’s a more widely used platform.

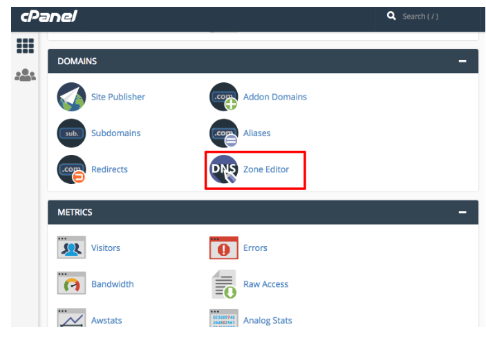
So you log into cPanel and scroll down to the Domains section. Click “DNS Zone Editor.”
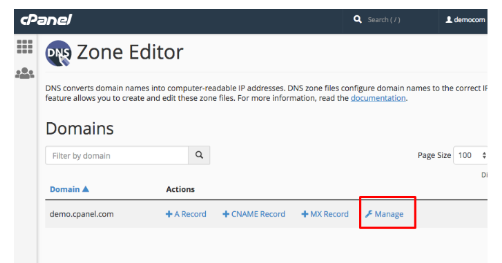
In Zone Editor, find the domain you’re setting up the CDN for and click “Manage.”
Now you should see a list of records associated with your site (A, CNAME, MX, etc.) Find your existing A record from the list and in the “record” field, paste the IP address Incapsula gave you.
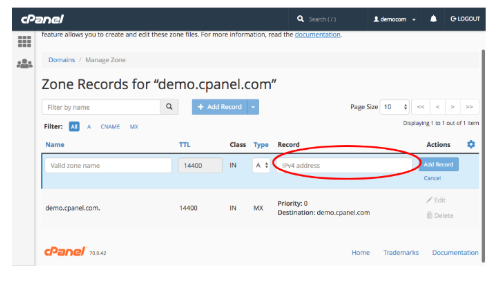
One down, two to go.
Now you need to add a new A record. You should see a button at the top called “+ Add Record.” Click that, make sure the type is set to A, and then copy in the second IP address Incapsula provided you. Click “Add record.”
Two down, one to go.
Lastly you need to change your CNAME record. If you filter by “CNAME” in cPanel it should pop right up:
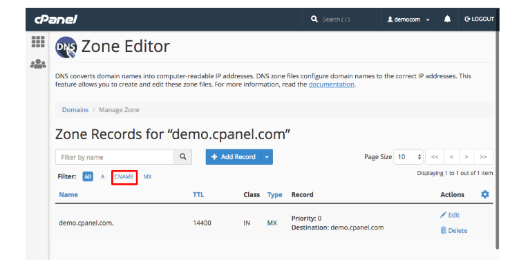
Then you can click “edit” on it and paste in the the record Incapsula provided.
Hit save on that, then you’re done messing around with DNS files.
Now if you head back to Incapsula and log in, you should see a site statistics page like this:
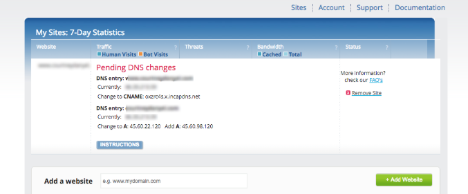
As you can see, it still says pending DNS changes. That’s because it can take a while (up to 48 hours) for changes to go into effect and show up in your Incapsula account. But once they do, Incapsula will send you an email saying they detected the DNS changes.
Once you get that email, all of your site’s traffic should be routing through Incapsula. They’ll start sending you weekly reports of your account statistics, insights, support activity and plan details.
Wrapping up
CDNs make it look like setting up your site with their servers is as easy as 1-2-3. While that’s a bit misleading, there’s no reason even the least tech-savvy among us can’t set up a CDN if they simply follow the instructions above.
If you’re looking to improve your website user experience, grow traffic and/or optimize your site for conversions, a CDN like Incapsula is a worthwhile tool to try out.